Monday, March 29, 2010

apron gift set

Tomorrow is one of my best friend's birthday's. She loves to cook. (And is super good at it too!) She has done so much for me and my family, so I wanted to make her something special. Here's what I came up with...
It is a version of this apron that I made a few weeks back. The picture kind of looks like it is trimmed in black, which probably would have looked okay, but it is actually trimmed in burgundy, to match her kitchen! I made a matching hot pad and oven mitt with the scraps. I hope that she likes it!

Wednesday, March 24, 2010

a finished project

Hooray! My husband and son are back from their father/son fun weekend away. Hooray because my technical support is back home! (The warm body in bed and kiss goodnight is nice too ;) I was able to get the pictures from our trusty old camera that I took a few days ago.

So one of my most recent projects was to try and make one of these...I've been in love with this bag since I laid eyes on the pattern. I finally got up my courage to give it a try. Here is my version...and an inside view...

The material I used was Joel Dewberry, Ginseng. Some adorable material that I picked up last fall on sale.

If you are new to sewing bags and purses, I'd give this pattern an easier-intermediate review. Amy's instructions are AWESOME. Great step-by-step directions, although there aren't a ton of pictures.

This bag is for a young lady (who I adore!) that is graduating from high school this year. I hope she loves it. (Because I sure do!) I will definitely be making more of these bags. I'm excited to test drive other fabric patterns.

Sunday, March 21, 2010

if it's not one thing...it's another!

I've been MIA for a few days...or so it seems.

It was one of those weeks that I just couldn't seem to get everything to fall into place. (You know that kind of week, right?) I'm not really complaining, it just is what it is!

I've actually been working on a handful of different projects, and even finished one! (Because even just finishing one project is something to celebrate, right?!) But...no pictures, at least not yet.

My hubby and oldest son are off to Arizona this weekend for their annual father/son trip. (They are watching a bunch of baseball spring training games.) They obviously took the good camera with them. The only problem is that I forgot to get the pictures off the SD card before they headed off. Then I had the bright idea to find our old digital camera to snap a few photos. Only to find that my laptop will not read the memory card from the old camera, and I can't seem to find a USB cable for the life of me. Argh.

On the bright side, in the next few days (once I can either get my grimy little hands on a USB cable or when the boys get home) I'll have some fun stuff to post!

Monday, March 15, 2010

table topper

I'm not sure what to call this. It's not big enough to be a table cloth. It's the wrong size to be a table runner. Really it is just a glorified big ole' hot pad! (22" x 22")We just got a brand new table. I've been waiting eight and a half years of marriage to get a nice kitchen table, and my dream finally came true! (Okay, that is a little miss-leading. We actually have a nice formal dining room set that we got a few years ago and love, but it's not something we use on a daily basis.) We've lived with hand-me-downs since 2001. I think my excitement over the new table is almost unreasonable, but I'm pumped! - That being said, I want to keep it nice for as long as possible! My husband suggested that we should have something in the middle of the table to put serving stuff on so that we avoid scratches (we've got place mats to eat on too). I whipped this up with the left over material from my apron.

I've wanted a good excuse to try this type of quilting for a long time. I recently got myself a walking foot. I was kind of an unbeliever that I could quilt like this without any puckers, but IT WORKED!! I think that spray basting is the key.

I'm excited to try straight line quilting on bigger quilts now.

Monday, March 8, 2010

selvage quilt update...

So when I started this quilt I knew that it was going to be a long term project. Something to sit down and do when I didn't have the bug to do something else. I am loving the process. Below are the blocks I have done so far...34 down and only 14 to go! I could stop with only two more, but I want a bit of a larger quilt. I don't know what it is about playing with a big stash of selvages that makes me happy. I can't wait to have it all finished.

My next dilemma is going to be figuring out how I want to quilt it. Any ideas?

Friday, March 5, 2010

Zipper Rosette Tutorial

So...this is the first tutorial I've ever tried to make. I'm a little nervous. Hopefully the instructions are clear and you'll want to make some of your own!

How to make a Zipper Rosette...

Supplies Needed:
-zipper
-upholstery thread or embroidery floss & needle
-pliers (are helpful, but not always necessary)
-scissors
-coordinating (with your zipper) felt
-hot glue gun

Step 1
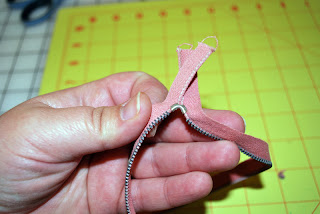
Take your zipper completely apart. This is where a pair of pliers can come in handy. Some zippers are just stopped with glue that can be forcefully pulled apart, or thread that can be sewn, but some have this little metal stopper that you can see above. To get them off I use a combination of pulling with pliers and yanking the zipper apart. As you can see in the next picture, all of the pieces don't always come off 'cleanly', but it shouldn't affect the final outcome.
*Note - I like to save the zipper pull to glue into the center of some of the rosettes, but its up to you.
Step 2Using embroidery floss, or some other very strong thread, knot the end of the floss and begin a running stitch about 1/8th of an inch from the bottom of a zipper half. I've found that a longer stitch is better (which is the main reason I do this by hand rather than with my sewing machine.)

Step 3Once you've sewn along the entire bottom of the zipper, pull your thread to form gathers. How tight you pull your thread is up to you. I've found that it is a lot easier to work with in the next few steps if you don't pull it as tight as you can. You'll want a little 'give'. Tie off your thread and snip.

Step 4This is the hardest step to illustrate, so I'll do my best to walk you through it. Starting with the edge of the zipper that you started your running stitch on, roll the zipper onto itself. As you are rolling, pull the raw edge from the beginning of the zipper (just a bit) through the hole in the middle. (This will make more of a finished middle and hidden raw edges.) Continue arranging the rosette by making each layer peak out from the previous.

Step 5Cut out a piece of felt that is close to the same size as your rosette. (Yep! This is the easy step!)

Step 6Liberally apply hot glue to the bottom of your rosette, and attach it to the piece of felt. Make sure when you glue it down to the felt that both the middle of the rosette and the very end raw edges are tucked under the rosette and glued down.

This is the point that you can add some 'bling' to the center of the rosette if you choose. (I like to use the zipper pull, but you could add a purl or gem, or something of the sort.)

Step 7Cut away the excess felt from behind the rosette.

You are now DONE!! Finish the rosette as you please. *I've added leaves to a few, but they are definitely cute enough to stand alone on their own too.* Attach to alligator clips, bobby pins, etc.!


Hopefully this little tutorial has been helpful! Happy crafting!

Wednesday, March 3, 2010

an awesome find!

So I recently got these at a thrift shop...A huge big ole' pile of zippers. Random, I know.

The story: I live in a super small town. Apparently we are just big enough to have out own little thrift store. I have never been inside said thrift store until two nights ago. I went in hunt of some big picture frames to spray paint and alter for a new project idea. I came out of the store with a bag of zippers! Back in their 'random we don't know where to put this stuff' area, there was a bunch of old ratty looking sewing stuff. I poked around a little and came across this bag full of over thirty zippers of different sizes and lengths. There was no price anywhere, so I went up to the checker lady to ask about the price. She offered the whole bag to me for $3!!! Can you believe it? JACKPOT!

Want to see what I came up with?Lovin' it! I can't wait to try more. Check back in a day or two for instructions, I think zipper rosettes are tutorial worthy!

Tuesday, March 2, 2010

hanging towel

I wish that I could claim this idea, but like most things out here in blogger land, I got the idea from somebody else. (Who I'm sure got the idea from somebody else, who got it from somebody else, and on and on...) No matter, I love it!I just made this for my kitchen. (It totally reminds me of those old ones that your grandma made with a crochet top. You know the ones I'm talking about, right? These are just such a fun more updated version!)

If you have a four year old boy(...or 44 year old boy for that matter) you probably know from experience that towels do not stay on towel bars. I think it is physically impossible for my son to not pull a towel off the bar when walking by or using it to dry his hands. I LOVE this hanging towel that can't just be pulled off. I'm not nagging at my son nearly as much...bonus!